I'm the Guest Designer for Scrapbook Steals today!! I got to work with two really gorgeous colors of twine from We R Memory Keepers - Aqua and Orange. The spools are enormous and they will last me a really long time. I used a lot, but I barely made a dent. The We R Memory Keepers Twine Spools are available today :)
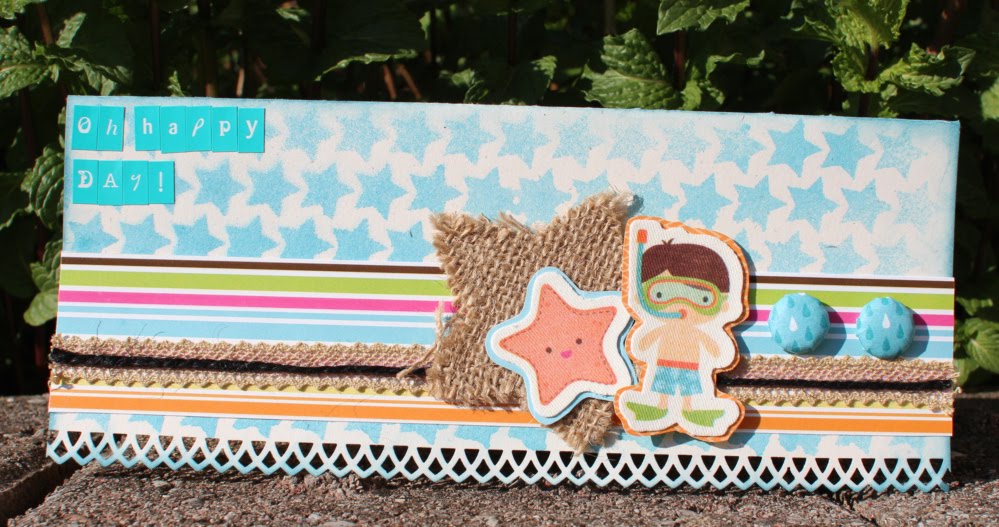
I decided that it would be fun to make a card - on such a small canvas, the impact of the twine is very evident. Here is my card, using the new My Mind's Eye paper:
In order to make the border, I added a thin line of glue. I used Beacon Adhesives "Fabri-Tac" glue, since it works so well, especially on cloth (and in this case, on twine). Then I added a twisted, haphazard border all around using the Orange twine. You could stop there, and have the one layer, but I decided to do a double border. I used a paper piercer and my Tim Holtz ruler to poke holes all around the edge, and then hand-stitched a border with the Aqua twine. On its own, this would have allow made an attractive border. But I really like the effect of the double border, since you have the more haphazard layer that looks like it has been stitched down by the more orderly layer. So this is a great example of a couple different ways of attaching twine to your layouts.
For the dress forms, I used my Tim Holtz Movers and Shapers Sizzix "Mini Sewing Room" die - I cut 3 dress form out of chipboard. I then cut two pieces of cardstock about the size of the body of the dressform and covered them with Fabri-Tac glue. I added a layer of twine by gluing it to the cardstock in layers going back and forth. Then, I simply die cut the covered cardstock with my die again, and glued to the chipboard dress forms. This is an easy way to create hand-made "twine embellishments" that gives your project a lot of texture. For the third dress form, I covered the body with some matching paper, and then finished it off with Glossy Accents for more dimension. As a last step, I finished off the inside of the card with more paper from the collection, and a Tim Holtz stamp.
I hope you guys liked my card and got an idea or two on how to make the most of your twine. For more ideas and info, and to see my post, check out the ScrapbookSteals.com BLOG!
Tuesday, May 8, 2012
Monday, May 7, 2012
Imaginsice and Canvas Corp!
This whole week, on the Imaginisce blog, the DT will be featuring projects created with Canvas Corp products, paired with Imaginisce products. I must say, I got a really amazing box of goodies from Canvas Corp that I was thrilled with, featuring some card bases, canvas and burlap embellies, a canvas bag, 7 Gypsies Printer's Tray, and Tattered Angels Glimmer Mists. I had a blast creating my projects :) Make sure you stop by the Imaginisce blog to check out what the rest of the DT did, today and the rest of the week.
I wanted to make a couple cards to give to kids who have summer birthdays (typically paired with a pool party). I loved the long skinny cards we got from Canvas Corp, and the Tattered Angels Glimmer Mist, and I thought they would make a great pair. The black hemp cord added the perfect accent to bring out the bright colors from the Imaginisce papers and stickers I used.
Boy Card Supplies:
Card Base: Canvas Corp "Skinny Cards" (4x9 in)
Paper, Canvas Stickers: Imaginisce "Makin' Waves"
Brads: Imaginsice I-Top and Small Brad Daddies
Burlap Star: Canvas Corp
Black Cord: Canvas Corp
Lace: Kaisercraft
Letter Stickers: My Little Shoebox
Mask: Crafter's Workshop
Color Spray: Tattered Angels
Border Punch: Martha Stewart Crafts
Ink: Cat's Eye Liquid Chalk
Girl Card Supplies:
Card Base: Canvas Corp "Skinny Cards" (4x9 in)
Paper, Canvas Sticker, Chipboard Stickers: Imaginisce "Makin' Waves" and "Berrylicious"
Bling: Imaginisce I-Rock and I-Rock Glitter Heat-Set Studs
Black Cord: Canvas Corp
Lace: Prima Marketing
Letter Stickers: My Little Shoebox
Mask: Crafter's Workshop
Color Spray: Tattered Angels
Ink: Cat's Eye Liquid Chalk
I also made a headband. My daughter is in a "the bigger, the better" headband phase, so I knew she'd love the gorgeous canvas flower for a headband. It was very easy to put together - I punched a small hole through the large flower, then paired it with a smaller sheer flower from Imaginisce, and added it to the headband, attaching with a large twist-daddy top that I covered with Imaginisce paper. I then cut the center out of an iron-on flower, and ironed it onto the middle.
Headband Supplies:
Headband: Imaginisce I-Top Twist Daddy Headband and Large Twist Daddy
Paper: Imaginisce "Makin Waves"
Bling: Imaginisce I-Rock Iron-On Flower and Mini Iron
Canvas Flower: Canvas Corp
Silk Flower: Imaginisce
About the Headband:
Saturday, May 5, 2012
National Scrapbooking Day!
Today is Nation Scrapbooking Day and Imaginisce is having a really fun Scavenger Hunt Challenge - check it out HERE!! Of course, if you play along, you're entered to win a prize :) You have until this Monday to enter.
Thursday, May 3, 2012
Some Odd Bookmarks!
I have a fun and quick Some Odd Girl project to share today - it's a great way to make your kids happy and use up LOTS of scraps at the same time! I decided to make bookmarks. For this, I recommend nice and thick, double-sided paper. I used Prima "Romantique". Prima paper is thick and has pretty patterns on both sides, so it was perfect for this project. I was able to use up some scraps from this older collection. I then added large brads in the top, and put lots of pretty old Basic Grey fibers for decoration. Using fibers is a great way to use up that old stash I know you still have!
I used the stamp set "Royal" from Some Odd Girl and colored her with Copics. For the clouds and the words "Dream Big", I used the "Grow" stamp set from Some Odd Girl. The 8 plain bookmarks are perfect for my daughter to gift to her friends, for all of them to color themselves. I stamped the image on Bristol Smooth paper, which is perfect for them to color up with pencils. And the pretty bookmark I colored makes a great teacher appreciation gift (my daughter is having teacher appreciation week this week at school). Let me just say that I scored big time, in my daughter's eyes, with this project. I believe her exact words were, "I'm very proud of my mommy" :) So if you have scraps of paper and old fibers cluttering up your space, this is the way to go! Let's face it - bookmarks are fun to make, but at this point, most adults have e-readers.
So, here is the main bookmark that I colored in:
And here are the 8 blank bookmarks for my daughter's friends to color:
And here are their backs:
Wednesday, May 2, 2012
Some Odd Girl May Challenge!
Today, I have another post with a May challenge, this time for Some Odd Girl stamps. The challenge this month is a sketch challenge, so be sure to check out the BLOG for the sketch. I used Balloon Kaylee (colored with Copics) and Bo Bunny 6x6 pp to make my card.
Tuesday, May 1, 2012
Imaginsice May Challenge!
Hi guys, Imaginisce has another fun challenge up for the month of May! Be sure to submit your entry to be entered to win a prize. The challenge this month is to create something using pink, bling, and flowers. I decided to do a slightly "grungy" take on this girly theme, and used some Tattered Angels mists and Crafter's Workshop and Prima templates to do a little creative misting. I used the "Makin' Waves" and "Hippity Hop" collections, and my beloved I-Rock to add some studs here and there.
Friday, April 27, 2012
Paper Lovelies DT Call!
As most of you know, I'm on the DT for the best kit club around - Paper Lovelies (See my blog post from Wednesday for the May kit reveal). Well, Carrie is looking for 2 more DT members, and the deadline is fast approaching - you only have a couple more days to apply! Send your design team submissions until May 1 to info@paperlovelies.com Submit 2 projects- also, the 2 design team members that are chosen will be announced on Facebook May 2, without any prior notice. Carrie is such a sweet and warm person, and this DT is very fun and stress-free to design for, so I encourage you all to apply!
Thursday, April 26, 2012
Another Some Odd Girl Card!
Today I'm sharing another card I made using the newly release Nouveau stamp set from Some Odd Girl. For this one, I used 6x6 "She Art" papers from Pink Paislee and a Cottage Cuts/My Little Shoebox die to cut the little clouds out. Yesterday, on the Some Odd Girl Blog, the DT posted some more samples using this adorable stamp set, so be sure to stop by! I used Copics to color the stamp.
Wednesday, April 25, 2012
More Kaisercraft goodness!
On Monday, I shared a new card with you using Kaisercraft's Bonjour line and today, I have two layouts using "Nan's Favourites" collection from Kaisercraft. How did I get my hands on it? Well, luckily it's all part of the May Paper Lovelies kit :) You get all the paper, the die-cut elements, the recipe cards, and some cute Kaisercraft wood flourishes and red Kaisercraft mini alphabet stickers. I really loved working with this kit, it was so me!
First up, I have "The Sweet Life"
My second LO is "SWEET". I die-cut the leaf sprays out of the brown b-side of one of the sheets from the collection - I love how neutral the backs are! The felt roll up flowers are from Kat Scrappiness.
Thank you all for stopping by, and make sure you check out Paper Lovelies!
Tuesday, April 24, 2012
Scrapbook Steals Deal :)
Hi guys, just a quick announcement that Scrapbook Steals - they have daily deals on scrapbooking supplies- is having a deal on the Imaginisce I-Rock tool and gems today on their site, so if you were thinking of getting one, today's the day. Also, ScrapbookSteals.com has a Blog, so be sure to check it out for various updates, project ideas, and info. I've used the I-Rock a lot, and I wanted to share a couple pages that I made before, using the "Sole Sisters" collection from Imaginisce. I love that the gems are heat set so they don't come off and there's no glue to mess with.
First is "Girly Girl". I made that black bling swirl myself, using one of the I-Rock templates :)
And "I Pick You". I love that you can get metal studs - those heat up and set within just a couple seconds and they look very modern. Perfect for a more masculine LO.
Blog Hop!
Hi everyone, welcome to my stop on the Imaginisce and My Little Bit of Whimsy (MLBOW) blog hop! As part of the Imaginisce DT< I was lucky enough to get a package of really adorable hand-sculpted buttons and stick pins from MLBOW. I created two layouts to show off some of my cute new embellies. First up, I have a layout using the Hippity Hop and Makin' Waves collections from Imaginisce. I kept it on the clean and simple side (or as clean and simple as it possibly ever gets for me :) I really wanted to keep all embellies to a minimum to show off the super cute MLBOW goodies - I used a polka-dot button, cute mushroom and ladybug, and the flower-shaped yellow button. I also used lots of die-cuts from the Hippity Hop collection - I so love that line!
For my second layout, I just had to use the "Sole Sisters" collection from Imaginisce to scrap this picture I got of meeting Sofie. Sofie is the owner of Scrapmatts (and she lives in Australia), but she was vising USA, and I finally got to meet her (after a year and a half of being on her DT!). I used lots of various buttons from MBOW, as well as a purse stick pin. It went perfectly with this collection. I also used some Scrapmatts laser-cut chipboard high heels and a purse. One of the high heels I heat embossed with Cotton Candy WOW Embossing powder from the Suzy West collection, and the other one I inked, and then hear embossed with clear glitter embossing powder, also from WOW. The purse, I heat embossed with Honey Earthtone Suzy West Collection powder.
Here is the blog hop order, in case you get lost:
Imaginisce blog
Rhonda Van Ginkel
Zoe
Ilene Tell (that's me! :)
MLBOW blog
So your next (and final) stop is the MLBOW Blog!
Monday, April 23, 2012
Nouveau Girls stamp release!
This month, two new stamps are being released for the Nouveau collection by Some Odd Girl. The first one I will show you today. Make sure you check out the Some Odd Girl Blog to see more samples of the projects made with this new stamp set by other team members. To color the stamp, I used Copics, and to make the card, I used the 6.5x6.5 paper pad from the gorgeous "Bonjour" collection by Kaisercraft. It just never gets old! The pretty crocheted doily is from Kaisercraft as well.
Saturday, April 21, 2012
WOW Blog Hop
Today is the the blog hop for the amazing WOW Powders! All the girls are sharing some awesome projects, so be sure to stop by all the blogs to see all the cool stuff you can do with embossing powders and the adorable stamps Suzy designed for WOW. The more comments you leave, the more chances you have to win a WOW prize, so be sure to stop by all the blogs and leave some love :)
So here is my project - I made a card using someold antique vintage Daisy D's paper swatches. I used a laser-cut chipboard vase from Scrapmatts and covered it with a couple layers of Ultra High Metallic Copper WOW embossing powder - ultra means it's very thick, like Utee. For the flowers, I used some very old ... antique ... vintage Prima flowers. Yep - those ones that came in super funky colors, and definitely ones that you're ready to trash. Well, hold on to them - I used gold embossing powder to give them a metallic look. Since they already came with all the texture and ridges, they were ready to go. For the leaves, I ripped the petals off one of the larger flowers and embossed them with Metallic Green - and there you have some pretty "metal" leaves. And the brads are "vintage" Making Memories brads. So I think this card is a great example on how adding a little embossing powder and altering your supplies can breath some fresh air into them no matter how "vintage" they are.
Here's the blog hop order:
Suzy Solorzano West
Angel West Bartonico
Donna O'leary
Sesil Chavez Cratin
Ilene Tell
Lara Yamamoto Scott
Tina McDonald
So next, hop on over to the talented Lara!
So here is my project - I made a card using some
Here's the blog hop order:
Suzy Solorzano West
Angel West Bartonico
Donna O'leary
Sesil Chavez Cratin
Ilene Tell
Lara Yamamoto Scott
Tina McDonald
So next, hop on over to the talented Lara!
Friday, April 20, 2012
Altered Love Frame
My dad's birthday was on April 13th (yep, this past Friday the 13th), so I decided to make him an altered art piece to hang at home. This is a fairly large piece - for the center, I used a 12x12 sheet of Punky Playground (corrugated cardboard from Punky Sprouts), so this gives you some idea of the overall dimensions. The frame was an unfinished wooden frame I got at Michael's fairly cheaply (especially since I used a 50% off coupon). I then misted it with brown, and then used my Prima "Brick Wall" mask to heat emboss with WOW Embossing Powder. I used a ton of gorgeous Scrapmatts laser-cut chipboard here, all heat embossed with WOW Embossing Powder. I also used the Earthtone Olive powder on some of the peachy leaves from IAmRose.com. I also love how the birdcage and frame around the photo came out looking like metal when embossed with Metallic Copper. The collection is Kasiercraft "Sweet Nothings", and I still can't get enough of it :) I used the papers and the die cuts from the collection. The flowers are from Petaloo and Recollections.
Thursday, April 19, 2012
Blog Hop!
Welcome to my stop on the blog hop! Imaginisce paired with The Twinery, and they do make such a great pair. I received a gorgeous range of twine in all colors of the rainbow and then some, and they were so fun to play with.
Since this is a blog hop, there are of course some fabulous giveaways up for grabs - 6 of them to be exact! Imaginisce will be giving away 3 Makin' Waves collections (valued at $37):
And The Twinery is giving away the "I Dream In Twine" package to 3 lucky winners as well (valued at $32):
To be entered to win, you must leave comments on each participating blog on the hop throughout the week. The deadline to comment is midnight EST, Sunday, April 22. Winners will be announced on each company blog on Monday, April 23rd.
For my project, I decided to scrap a picture of my kids from this Easter - we got to snap a quick photo with the Easter bunny....I'm told he was very soft :) I used the adorable Hippity Hop collection and of course lots of twine - to tie on top of the birdcage, to thred through a button, to tie through a button, to outline borders, and of course to make the cute flowers. To make the flowers, I cut circles out of cardstock and added adhesive, then wrapped twine around it in a circle, starting from the center. Then I ran them through my Big Shot with the flower die from Tim Holtz - Mini Tattered Florals (Movers and Shapers). Easy enough!
In case you get lost, here is the order for the blog hop:
The Twinery Blog
Imaginisce Blog
Karola Witczak
Mary Ann Jenkins
Tifany DeGough
Ilene Tell (that's me :)
Dorangela Bobet
Regina Mangum
So please leave a comment, subscribe if you like, and next, hop on over to Dorangela!
Subscribe to:
Posts (Atom)