I wanted to share with you all that I'm now on the Scrapmatts DT - they are an Australian company that makes laser-cut chipboard embellishments. You all know how I love to alter stuff, so this is super exciting. Let me share with you a few of my favorites:
Can you tell I'm super in love with these and think they're super cute and really can't wait to get started?! LOL Come join me on their brand-new Ning network!!
Sunday, November 21, 2010
Let Me Count The Ways...
Another LO using Echo Park, this time the "Life Is Good" line. I bought it back when it first came out at Your Scrapbook Stash (btw, if you've never checked it out, it's worth a look - they have a great selection, usually a 20% off coupon and free shipping over $30 - great deal!).
This is one of DH and DD, back from April. Yes, she IS trying to lick him! LOL
Monday, November 15, 2010
Fun
This LO is about DS and I spending some time outside this past Friday. I remember looking at him and being so lost in the moment - the weather was so nice and fresh and warm for November, and DS was so happy, and it was sunny and bright - you know, one of those moments that is so fleeting but you wish you could hold onto forever because it's so precious. I guess I figured scrapping it was as close as I could get to holding onto it. I matted the pic of DS and the journaling tag onto chipboard to give them a little pop and added a lot of burlap for dimension and texture. A lot of misting of the edges, both of the front and back of the die cut pp. Also, lots of hand stitching everywhere and fussy cutting. TFL!
Friday, November 12, 2010
So Serious
Hi all, I wanted to share a LO I made, using another of my baby pics. Sometimes it's fun to depart a little from all the kid LO's and do one about me. Although I guess it's still a kid LO. Well, in any case, this one is about me as a baby, and it's using the Echo Park "A Walk in the Park" line...can you believe I am almost done with my whole pack of it?! It's definitely a record for me! I'm kind of feeling like I need to save the last couple sheets since I like it so much, just in case (LOL....yes, this IS how I've built up my considerable pp stash).
Sorry about the 3 images of the entire LO - I was trying to get different lighting and now I can't decide which one came out best. It's between 1 and 2, I think. Let me know which one you prefer! LO 1 was done outside in the sunglight, #2 was inside (the way I always have been photographing all my stuff), and #3 was outisde but out of direct light.
I used a lot of fun stuff here, as you can see. I used gesso for the white paint splatter. I handstitched the circle with canvas/burlap underneath it. I then used my Sizzix Tim Holtz Tattered Flowers cutting die to make the flowers out of pp and out of the burlap. So lots of hand stitching everywhere.
I also made the buttons myself (except the 2 small blue ones - those are GCD studios). It's really easy to make them! I used my Sizzix Bigz circle die. I cut out chipboard pieces about the size of the buttons I wanted and then used glue to cover them with the Echo Park pp. Then I ran them through the machine and got the circle shapes. I used another button as a remplate of where I wanted the holes for the bigger buttons, and then used my Crop A Dile to punch holes there. For the small buttons, I used a "button hole" punch I have, which just makes two small holes next to each other. And viola - easy buttons!
So even though this LO looks like it has a whole lot of stuff on it (and it does), it was really cheap and economical, since I was mostly just using the pp and some chipboard and canvas and floss to make everything myself.
Thanks for stopping by!! And if you have a moment, remember to leave a comment and let me know which lighting you prefer - LO #1, #2, or #3. That will be helpful to me in the future when taking pics of my stuff. Thanks!!
Wednesday, November 10, 2010
A wintery Harmonie LO
My first blog post for Harmonie:
And Harmonie has some beautiful collections, just for that occasion. Noel and Blizzard are both perfect for cold weather. This is my first official blog post, and I wanted to share a layout with you using mostly Blizzard. I'm really loving working with the gorgeous Harmonie papers and products! Especially since I was born in Russia, where the weather is somewhat similar to Canadian weather. So this is a pic of me as a baby :)
Supplies:
- I love to mix collections, so I used paper from Blizzard and Noel: Verger de Glace, Petits Reners, Firmament
- white pom pom ribbon RU067 - I actually cut off the pom poms to decorate the centers of the snowflakes - they look like little snowballs
- Blizzard stamps set - #52036
- Alphabet stickers are the white peel offs
- Nesting scalloped circles chipboard pre-cut shapes - I used one of the smaller circles behind the center snowflake on the top left, to give it more pop - I colored with with white crackle paint for a more wintery feel
I loved the strong blue of the die-cut paper, so to emphasize it, I painted the top left corner with white acrrylic paint (just dry brushed it on). This made the right corner stand out even more and call attention to the color. I decorated the tree at the bottom with rhinestones and a hanging lamp.
_________________________________________
In other news, I have a special announcement to make. ScrapStreet is looking to add to the DT!! That mean YOU (yes, YOU) need to get your butt in gear and send in your app! Here's the info:
ScrapStreet.com EZine is looking for fun and creative designers who
love to scrapbook to add to our team. Layout, card, and altered artists
are all encouraged to apply.
The Job:
Our team publishes a monthly EZine with thousands of subscribers and a 5
year history. We love finding and showcasing talented scrappers and
beautiful products. If you are selected for our team, you will write a
monthly article which will include selecting and requesting the work of
designers, combining the work into an interesting article, and meeting your
deadline.
You will also receive products at least 6 times a year from a variety of
manufacturers and will scrap several items to showcase their lines. It is
an excellent opportunity to increase your visibility in the scrapping
community while having fun.
To Apply:
Send the following to staff@scrapstreet.com
contact information
a short statement of why you are interested in joining us.
3 of your favorite creations showcasing your style.
a link to your blog.
a link to your gallery.
End date: November 29, 2010
And Harmonie has some beautiful collections, just for that occasion. Noel and Blizzard are both perfect for cold weather. This is my first official blog post, and I wanted to share a layout with you using mostly Blizzard. I'm really loving working with the gorgeous Harmonie papers and products! Especially since I was born in Russia, where the weather is somewhat similar to Canadian weather. So this is a pic of me as a baby :)
Supplies:
- I love to mix collections, so I used paper from Blizzard and Noel: Verger de Glace, Petits Reners, Firmament
- white pom pom ribbon RU067 - I actually cut off the pom poms to decorate the centers of the snowflakes - they look like little snowballs
- Blizzard stamps set - #52036
- Alphabet stickers are the white peel offs
- Nesting scalloped circles chipboard pre-cut shapes - I used one of the smaller circles behind the center snowflake on the top left, to give it more pop - I colored with with white crackle paint for a more wintery feel
I loved the strong blue of the die-cut paper, so to emphasize it, I painted the top left corner with white acrrylic paint (just dry brushed it on). This made the right corner stand out even more and call attention to the color. I decorated the tree at the bottom with rhinestones and a hanging lamp.
_________________________________________
In other news, I have a special announcement to make. ScrapStreet is looking to add to the DT!! That mean YOU (yes, YOU) need to get your butt in gear and send in your app! Here's the info:
ScrapStreet.com EZine is looking for fun and creative designers who
love to scrapbook to add to our team. Layout, card, and altered artists
are all encouraged to apply.
The Job:
Our team publishes a monthly EZine with thousands of subscribers and a 5
year history. We love finding and showcasing talented scrappers and
beautiful products. If you are selected for our team, you will write a
monthly article which will include selecting and requesting the work of
designers, combining the work into an interesting article, and meeting your
deadline.
You will also receive products at least 6 times a year from a variety of
manufacturers and will scrap several items to showcase their lines. It is
an excellent opportunity to increase your visibility in the scrapping
community while having fun.
To Apply:
Send the following to staff@scrapstreet.com
contact information
a short statement of why you are interested in joining us.
3 of your favorite creations showcasing your style.
a link to your blog.
a link to your gallery.
End date: November 29, 2010
Thursday, November 4, 2010
Publication Toots!!
Ok, you have to pardon this post but I'm excited so I had to share!! Fell free to ignore this flagrant bragging LOL
First in the news is that I had my LO "I Love You To The Moon And Back" picked up for publication by Scrapbook Trends in their upcoming idea book "Create: Embellish It". That's my first time being pubbed with ST so I'm excited!
But that's not all! I got my Nov/Dec issue of AAA World - I don't know how many of you have AAA. But in this issue they have an article called "Cut and Paste" and my stuff is in it!! Not only that, but there is a lot written about my stuff, as well as several quotes from me about scrapping your travels. And my Egypt mini is featured front and center...in fact, it takes up a whole page all by itself, which is pretty awesome considering the whole article is only 3 pages. On the last page of the article, the cover of the Dominican Mini is also mine. My submissions were the only ones that actually made it into the article! Check it out - I scanned it in :) And ignore the big white spot on the cover, I just wanted to remove our addy.
Creative Charms "Pretty Flowers" LO
I was lucky enough to get to work with the fabulous Holiday Wishes kit.
Holiay Wishes - 145 Piece Kit of the Month
This kit will fulfill your wishes for the perfect product to complete you holiday projects. It includes some our newest holiday items along with our favorite and most popular. Each kit contains:
* Winter Chipboard Stickers - 6 Pieces
* Winter Seasonal Sparkles - 25 Pieces
* Red and Green Vintage Jewels - 12 Pieces
* Christmas Vintage Metal Frames - 6 Pieces
* Christmas Twinkle Stickers - 10 Pieces
* Red Vintage Poppies - 8 Pieces
* Red and Green Gem Stickers - 76 Pieces
* 18" Red Fancy Polka Dot Ribbon - 7/8" Wide
* 18" Green Fancy Polka Dot Ribbon - 7/8" Wide
All the chipboard stickers and the vintage frames would be really awesome for Holiday Cards and layouts. So I thought I'd do something a little different, to show some other ways this kit could be used - and I can always get to the stickers closer to the Holidays :)
The red vintage poppies, the red and green polka dot ribbon, and the green vintage jewels and green gem stickers are all from the kit. I also used the green braided daisies. In order to create a more uniform look and have the daisy blend in, I took off the center button and used one of the pearl brads that comes with the vintage poppies instead. The pp is MME, "Quite Contrary" line.
Wednesday, November 3, 2010
So exciting!!
I will be getting a package of Bella Boulevard goodies soon - I was one of the winners for their challenge at 2Peas! I entered my Linvilla Orchids mini for that one. Check it out HERE!
Also, the November issue of ScrapStreet is now available! Check it out HERE and my article is HERE.
Here are the current calls:
February Article Calls - Features
Call 1: Sweet Love. Do you have a layout that you made about a love for chocolate? Or perhaps there's another sweet that you can't put down. We want to see all those chocolate and candy layouts. Don't have a sweet tooth? Show us how you were inspired by chocolate or candy...it could be in the texture or you were inspired by the wrapper, just let us know!
Call 2: Shot Through The Heart. Let us feast our eyes on your projects that include arrows.
Call 3: Shabby Chic. Calling all shabby chic scrappers! We want to see your layouts, cards, and other projects that portray your shabby chic style!
Call 4: Lace it up. Use lace in your creations and share them with us! *** That one's mine, so be sure you send all your LO's where you used lace in!!
February Article Calls - Fixtures
Chic Street: Doilies aren't just placemats anymore. Call for layouts using paper doilies!!!
U-Turn: Oh, mini-albums, how do I love thee... Show us what or who YOU love in the form of a mini-album! Please include multiple photos in your submission!
Open Road: Put the focus on journaling! February is one of the biggest times of year for receiving greeting cards. Grab a sentiment or quote from a greeting card that catches your eye and let it inspire your layout! From hello to love to birthday cards, read on and get creative.
Easy Street: There's a time and place for everything! Share your layouts on how you capture this statement in your layouts. Whether you capture this statement through your photos or journaling, let's see them!
Card Corner: Let us publish that special card you be giving/sending to your special Valentine this month.
Deadline is midnight November 29th ... for all calls.
Please send your work to submissions@scrapstreet.com.
Please send a separate email for each submission you would like to be considered for publication. Please keep the image size around 600 x 600 pixels. Thank you!
Tuesday, November 2, 2010
Harmonie challenge
I created my first Harmonie LO based on this month's challenge, which is a sketch. Open to USA and Canada, you can win a Harmonie prize pack if you play along HERE
Monday, November 1, 2010
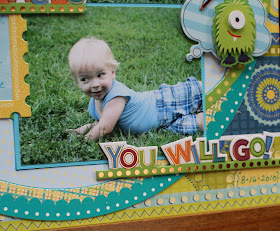
Oh The Places You Will Go
Another 3Birds LO about my DS...no frills or flowers! Yay for me :) Everything here is 3Birds except that brad, which I believe is Sassafras. So here is my 3Birds blog post today:
Anyone remember that book? Of course you do! Well, it's one of the chipboard titles included in your Sticky Sparkly Play on Words kit. That kit is so full of goodness - letters, borders, titles, quotes, embellies, etc. all in foiled and glittered chipboard. Really cool stuff. I'm also in love with the new Super Sticker Nestables that are flocked - the large stickers make it so easy to create layer - just peel stick and you're done. So here's a really super quick and easy LO I made about my DS - who's always on the go, and is clearly going places :)
I also added pop dots to some of the chipboard to make it have more layers, and I added the 3D embellies for even more dimension - fun and easy!
Supplies:
Paper: Focus on Photos
Cardstock: Must Have Cardstock - Brights (love that bright blue for matting pics!)
Stickers: Super Sticker Nestables - Flocked
Chipboard: Sticky Sparkly Play on Words
Embellishments: 3D Embellishment Kit
Everything you see here is 3Birds except the brad. That's what I love about 3Birds - you buy a few of the kits and you already have everything you need to make beautiful LO's. And they're perfect to take with you to crops, etc - really cuts down on having to pack things or plan things.